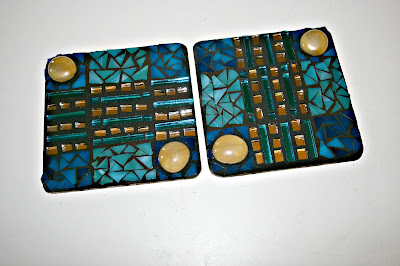
In this post I've shown one way to make two 4 inch coasters from start to finish using stained glass and mirror. These coasters take 2 days to complete. They can be done in a weekend! Please refer to the previous post to see how to grout: mosaic-coasters-part-one.
For this project you will need:
1st part:
- Stained glass and mirror
- PVA glue
- glass nippers
- 2 MDF or wooden coasters (prime with a glue/water mixture as shown in mosaic-coasters-part-one)
- Sanded grout
- Gloves
- Dust mask
- Wooden craft stick
- Newspaper or plastic
- Clean, dry rags
- Acrylic paint
- Painters tape (optional)
- Felt pads (optional)
- String or ribbon (optional)
Art Level: Beginner/Intermediate
Difficulty: Medium
For these coasters, I drew a simple design to follow. You can have a lot of fun designing your coasters and considering what colors you'll use. I decided to go with 2 colors of blue, ice blue and blue & navy streaky stained glass, silver and turquoise mirror and glass 1/2 circles in cafe latte.
 |
| The first step is to draw the design and pick out the glass and mirror you want to use. |
 |
| To make the design interesting, I used the mirror glass in the center. |
 |
| Filling in the outer sections with stained glass, cutting the small square pieces into triangles. |
 |
| Easy designs are best to use when learning how to mosaic. |
 |
| All pieces are in place and the glue needs to dry for 24 hours before grouting. |
 |
| The glass gems at the corners are to help keep a glass or mug in place when sitting on the coaster. |
Aren't they awesome?!
Wrap some ribbon around your coasters once the grout is dried and sealed. Gift them, keep them handy for those times when you aren't sure what to give someone or use them whenever you want to feel fancy.
Any questions? Please leave comments or send me a private message if you have anything you'd like to discuss.
Next week, I'll share a list of suppliers and a few people I admire who make mosaics for you. The fun of creating mosaics is to find inspiration to try new things!
Support Independent Artisans, Designers and Crafters for your gift-giving needs all throughout the year. Thank you!~Cindy, EarthMotherMosaics


No comments:
Post a Comment