Wednesday, February 28, 2024

Midweek Progress

The midweek progress isn't very much, but enough to share.

I got a little further on the 2nd Practice Board. I think I want to add a few little things. For example I'm not crazy about seeing the glue "stains" around the things on the board but the design itself around them is interesting enough to highlight it with maybe a marker or black ink.


I drew out simple designs on two more sets of coasters. Haven't yet started on them but here's what they look like before I add a mosaic.


I starting cutting up mirror pieces for the coasters and this panel below was asking for attention. I made this substrate using a piece of square Styrofoam and covered it in cement to make it solid enough to mosaic on. Not a great photo (it's raining today) but you get the idea. Once all the areas are covered in mosaic I'll put it aside again. I want to see how I feel about the background before I finish it.


And now it's time to get back to the coasters.


Enjoy the journey.

 Cindy aka EarthMotherMosaics


Support Independent Artisans, Designers and Crafters for your gift-giving needs all throughout the year. Thank you!~Cindy, EarthMotherMosaics


Wednesday, February 21, 2024

Art Exploding Everywhere!

 It really does feel like an art explosion happened within the last few weeks. It's almost time to unroll the blanket and get under it for a week or so. Until then, here's how it's been going.

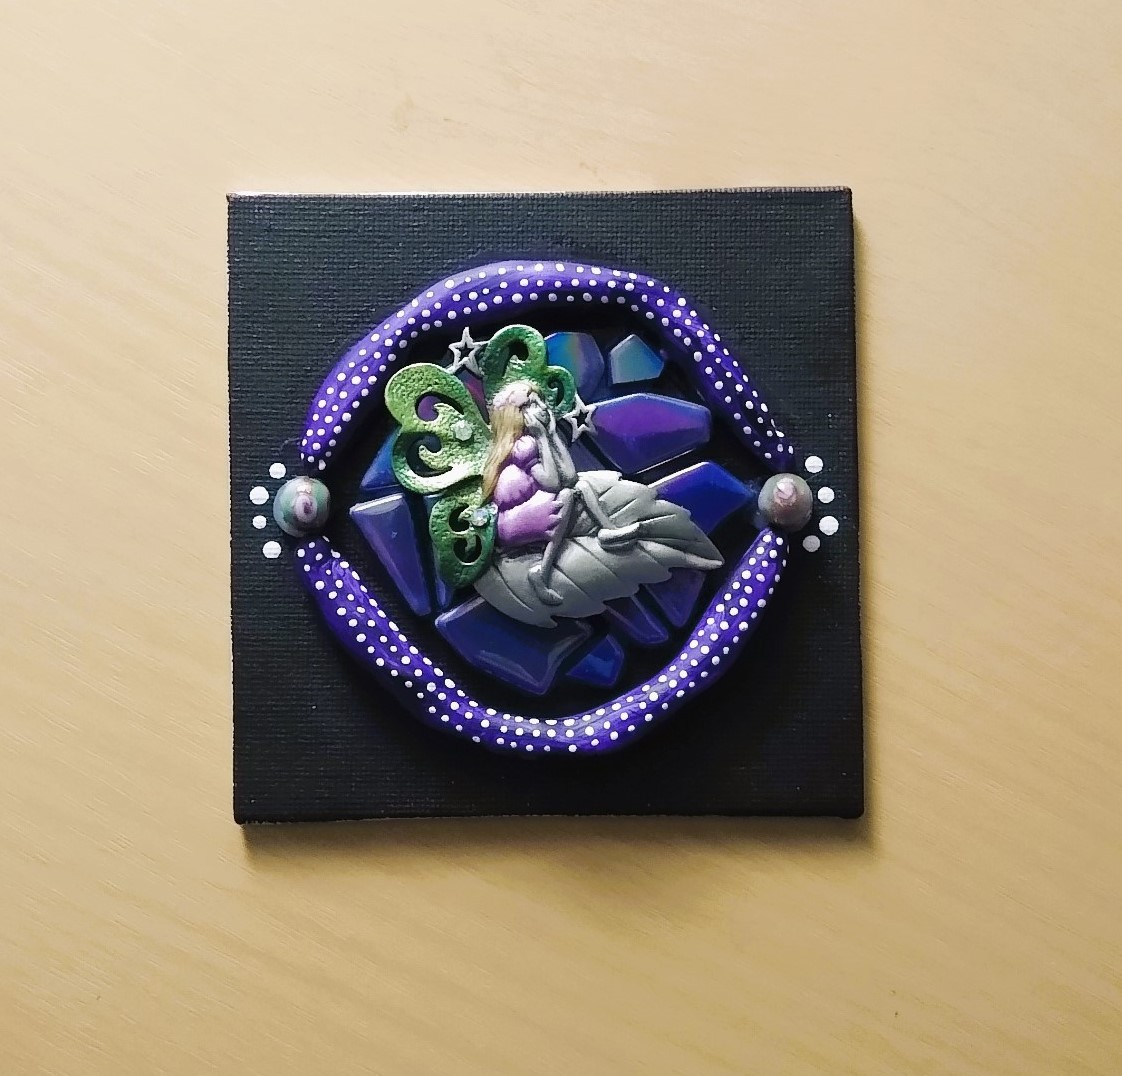
I purchased some pretty mirror shapes small enough for accent pieces. I added them to the latest dot painting and really love the way it all came together.

There's room for improvement with my dot painting but part of that is due to my hands and fingers getting tired. Instead of pushing through the pain, I should stop and rest. I'm trying to be more patient with myself as I am getting older. It's not always easy.

Valentine's Day was celebrated with real tie dye roses this year from my daughter. Of course I had the perfect vase!

The last set of coasters in grey are shown here before grout. A set of four in this design is now waiting in the "to be grouted" pile.

Believe it or not, I finally got the coasters made for the Norway family. The other set will probably go into the shop. Time will tell. I might just hold onto them and the ones above and gift them at some point to someone. It's hard to say.

Had some fun with air-dry clay too. I made some cool flowers. Eventually I'll get better at making them the same thickness and get a few more acrylics for different color choices.

Funky dot painted flowers in clay. Fun to do!

Practice board #2 in progress. I had no real plan for it other than to try something in clay. Upper left is a circle of clay with a piece from a lamp (I think) used as a stamp. I also think it might be aluminum but I'm not sure. It's really pretty, though, so I have kept it handy to use as a template.

I used mica powders over a few different colors of paint. Tried dots around it but didn't like that. Painted over it but there may be some beads glued down over that area. Practice boards are exactly for this purpose, to experiment and see what works.

Some of the detail of the aluminum piece came through really well in the clay. Mica was fun to play with as well.

This one is still a WIP. I don't like the black. It makes the whole thing a little too dark and doesn't convey the message very well. It WAS painted brown but for some reason I decided to cover that up with black. You can see the brown in the word "PEACE". I might have to play with this a lot before I get it right.


I made a frame using cardboard and brown craft paper. I'm not thrilled with the stand but I did this all in one day and by the time I got to the stand part of it, my hands wanted to stop. I did continue (see note above mentioning this very stubborn trait) and got a stand but it doesn't lean, it sits upright. That's fine for a first effort.

Now it'll be painted in black and the doodle can slide into place. More of these are going to get made, especially to learn how best to get a stand to hold it at a tilt.

I did a mosaic on a wine bottle too using a broken mug and parts of a bowl and glass circles or gems as I call them. It was made using thinset and although I always grout, this one I'm not. For some odd reason, I like the way the thinset looks coming up out of the corners of the dish tiles. It's not done the "right way" of course; using thinset with a trowel and getting it layered so whatever goes on top lays flat. You can't do that with a 3D bottle. Let me rephrase that ... I can't do that with a 3D bottle.


The stopper is a lava lamp light bulb I put a mosaic on for another bottle but I like this one better for it, so it's staying. Not yet glued into place but will be. Ribbon and twine were added to the top and my own little peace sign signature added to the back by the handle. I think it's awesome.

Here is a bottle I made years ago.

I made a stopper for it and it too is in the grout pile.

I'll share another photo of the bottle with the stopper once it is all together.


Enjoy the journey.

 Cindy aka EarthMotherMosaics


Support Independent Artisans, Designers and Crafters for your gift-giving needs all throughout the year. Thank you!~Cindy, EarthMotherMosaics


Thursday, February 8, 2024

A Busy Week in my World

 A busy week in my world, for sure. First let me share the mixed media piece I mentioned last post.

This is done on a 4 x 4 inch canvas I painted black. I did a little mosaic of sorts using Lapis Lazuli tiles (loved these so much; hope to get more at some point) within a circle of no bake clay (rolled and then sealed with glue/water mixture to keep from cracking) painted in violet acrylic, a broken brooch, two glass beads and white acrylic for the dot painting. The fairie brooch was a gift from my daughter and now it sits lovingly in front of me propped up by my computer. The best news is that the clay can be painted which means it'll work for future projects using it in mosaics once I get some molds that are on the wish list.


Now the doodle art is next. These are usually done in an evening. Sometimes more than one can be done. Others are still being worked on after two days. It just depends on the design. Lots to look at, I'm sure, but all were so much fun to create. I used stencils for some of them, some are intuitive.


And lastly, the mosaic coasters. It was a true joy to work with tiles that were all one thickness. No cuts or DNA was spilled ... that's rare for me! Grouting was easy and I did all 8 in one sitting.

However, it turned out that the adhesive on the tape mixed with the oil I used for the backs (should have done that part last ... duh) along with the glue I used for the tiles made a sticky residue after the tape was removed. I also noticed the scoring I did on the wood was visible around the edges since I decided not to mosaic all the way to the edge. That was something I didn't anticipate and will now leave the scoring part out of the next set. I'm fairly sure just using sandpaper is enough to give the glass and/or tile something to grab hold of.

What a mess! Cleaning the wood with white vinegar and sanding the edges around the tiles again helped get rid of some of the staining and discoloration but not all of it. They needed some more TLC.

The best thing I can do is paint them and I believe the first one I have painted looks good. Thank all the Muse Goddesses who share my space with me!

I might have to put a sealant on the paint but for the moment I'll concentrate on painting the rest of them. I've yet to start work on the ones I'm making for the family in Norway but making mistakes with these is the way to do it. These can still get listed for sale once they've met with my approval.

All comments and questions are welcome. Have a great weekend! If you want me, I'll be in the Purple Palace Art Space!


Enjoy the journey.

 Cindy aka EarthMotherMosaics


Support Independent Artisans, Designers and Crafters for your gift-giving needs all throughout the year. Thank you!~Cindy, EarthMotherMosaics


Monday, February 5, 2024

Mosaic Monday

It feels like a Mosaic Monday to me! It's been a productive weekend.

The tray I was going to mosaic for the Norway family has been nixed. The bottom wood split where the nails holding it together are. In 4 sections along the outer edges.

Sorry about the fuzzy shot, but even fuzzy you can see it. Not suitable for my needs.

Luckily I can do something with it; fix the splits with either wood filler or Plaster of Paris (both need to be purchased but also need to be in my supply cabinet) and I can paint it. Maybe put something light in it; paper ephemera for instance.

And so I moved onto the coasters. A set will go to Norway and the rest will go into my shop.

This set was primed with Kilz. Not all of them are going to be done in this way. I like the natural wood showing through.

I made a color mistake - used a light grey over the Kilz and it didn't really look good. The white from the primer came through and I quickly used up this small tube. What I did was mix up white and black and got the perfect color as you can see below.

After adding the felt pads I decided the paint needed to be protected from scratches if possible so I have sprayed the sealant on them. I can replace the pads if I need to since these were added too soon they might not be sticky after the sealant was sprayed on.

I made a few coaster sets using olive oil for the backs. I love the way the wood look using oil. It's enhanced the wood a little bit and isn't oily to the touch, it sinks in.

I made 2 sets of coasters for the shop this weekend. They'll be grouted soon, it doesn't take long for these kinds of mosaics to dry.

The funniest part for me was telling myself NOT to cut them into triangles which is my "go to". It was hard to leave them in squares. And it was hard for me to go back 20 years to a simple design in my head. 


They look like a quilt with the blue tape around them. The tape was used as a measurement guide for me. This tape is 1/2 inch wide. Perfect. Believe it or not, I can't draw a straight line. Not even with the help of a ruler. Using this tape makes it so much easier to get a straight line and it will come off after I've grouted.

I know I shared the color tiles last time, but I'll share them all again below. I'm not sure all will get used in the coasters but I have a lot of them and can use them throughout the months in future mosaics yet to be dreamed of.


The supplies list is below. I'm not including the tray because it basically fell apart.

If you make mosaics, I highly recommend these two sites.

Vitreous and Morjo™ Mosaic Tile: https://mosaicartsupply.com/

Van Gogh Stained Glass: https://mosaicsbymaria.com/

The glue I prefer is: Aleene's Original Tacky Glue. It is easily found and reasonably priced. If you're doing indoor mosaics, this works really well watered down a bit (ratio 1:1) as a primer, sealer and over glass-on-glass mosaics to make sure the grout doesn't bleed through the stained glass before grouting, and as an adhesive full strength for glass, dishes and mirror. It takes a little while to dry to clear but it does get there.

Next post will have a mixed media project I've worked on and some painting/doodling. Look for that midweek.

Enjoy the journey.

 Cindy aka EarthMotherMosaics


Support Independent Artisans, Designers and Crafters for your gift-giving needs all throughout the year. Thank you!~Cindy, EarthMotherMosaics

Thursday, February 1, 2024

In The Studio - Part 2

 To continue ... more photos and explanations under each one.

I've been gathering up the tiles for the tray I am making for my daughter and her husband in Norway. I shared before the design I had in mind but it wasn't working with their color scheme which is mostly grey, tan, white and black with wood. As far as I can tell, these are easy to relax around. Soothing, I suppose. In any case, I have one more set of iridescent tiles coming on Friday in white and then I can begin the fun part. Making the mosaic! I'm getting some coasters at the end of the week as well and a few will go with this tray using the same tiles.


Here's the color choices for the dish I am going to mosaic. It took a while to decide on these colors. I think I'd be happiest with less color choices sometimes ... I know ... we human's are never satisfied. However, I really do love all the choices I have. It wasn't always this way, I remind myself. The decision this time was gold Van Gogh glass, green glass dots, a ceramic dot and black tiles. I'm thinking if I start in the center and work my way out it should be pretty cool looking but I have a way of never finding center, even when I walk I go from one side to the other when I stand up. Hahaha. So I might start on the outer section and work my way in. I'll let you know what I decide.


And ... it was grouting day on Tuesday! 3 switch plate covers, two small dishes (4 inches) and a larger dish (8.5 inches) all done in a popular color around here at the moment ... grey.


Out of the three, my favorite turned out to be the heart. That was the first one I made in this group. I really love the way the red glass has a texture to it which became more visible once grouting happened. Very cool.

I'm still doing finishing touches on the switch plates but when they are all ready for their 15 minutes of fame, I will post here first before listing them on my GoImagine shop.


I'm getting ready to doodle on this one. I shared this yesterday. It's water color. I used a stencil for the circles because I am not good at drawing circles freehand. I don't know how much doodling I'll do on it. Maybe just inside the circles. Time will tell.


Enjoy the journey.

 Cindy aka EarthMotherMosaics


Support Independent Artisans, Designers and Crafters for your gift-giving needs all throughout the year. Thank you!~Cindy, EarthMotherMosaics