It really does feel like an art explosion happened within the last few weeks. It's almost time to unroll the blanket and get under it for a week or so. Until then, here's how it's been going.
I purchased some pretty mirror shapes small enough for accent pieces. I added them to the latest dot painting and really love the way it all came together.
There's room for improvement with my dot painting but part of that is due to my hands and fingers getting tired. Instead of pushing through the pain, I should stop and rest. I'm trying to be more patient with myself as I am getting older. It's not always easy.
Valentine's Day was celebrated with real tie dye roses this year from my daughter. Of course I had the perfect vase!
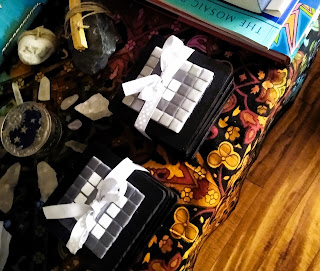
The last set of coasters in grey are shown here before grout. A set of four in this design is now waiting in the "to be grouted" pile.
Believe it or not, I finally got the coasters made for the Norway family. The other set will probably go into the shop. Time will tell. I might just hold onto them and the ones above and gift them at some point to someone. It's hard to say.
Had some fun with air-dry clay too. I made some cool flowers. Eventually I'll get better at making them the same thickness and get a few more acrylics for different color choices.
Funky dot painted flowers in clay. Fun to do!
Practice board #2 in progress. I had no real plan for it other than to try something in clay. Upper left is a circle of clay with a piece from a lamp (I think) used as a stamp. I also think it might be aluminum but I'm not sure. It's really pretty, though, so I have kept it handy to use as a template.
I used mica powders over a few different colors of paint. Tried dots around it but didn't like that. Painted over it but there may be some beads glued down over that area. Practice boards are exactly for this purpose, to experiment and see what works.
Some of the detail of the aluminum piece came through really well in the clay. Mica was fun to play with as well.This one is still a WIP. I don't like the black. It makes the whole thing a little too dark and doesn't convey the message very well. It WAS painted brown but for some reason I decided to cover that up with black. You can see the brown in the word "PEACE". I might have to play with this a lot before I get it right.
I made a frame using cardboard and brown craft paper. I'm not thrilled with the stand but I did this all in one day and by the time I got to the stand part of it, my hands wanted to stop. I did continue (see note above mentioning this very stubborn trait) and got a stand but it doesn't lean, it sits upright. That's fine for a first effort.
Now it'll be painted in black and the doodle can slide into place. More of these are going to get made, especially to learn how best to get a stand to hold it at a tilt.
I did a mosaic on a wine bottle too using a broken mug and parts of a bowl and glass circles or gems as I call them. It was made using thinset and although I always grout, this one I'm not. For some odd reason, I like the way the thinset looks coming up out of the corners of the dish tiles. It's not done the "right way" of course; using thinset with a trowel and getting it layered so whatever goes on top lays flat. You can't do that with a 3D bottle. Let me rephrase that ... I can't do that with a 3D bottle.
The stopper is a lava lamp light bulb I put a mosaic on for another bottle but I like this one better for it, so it's staying. Not yet glued into place but will be. Ribbon and twine were added to the top and my own little peace sign signature added to the back by the handle. I think it's awesome.
Here is a bottle I made years ago.
I made a stopper for it and it too is in the grout pile.
I'll share another photo of the bottle with the stopper once it is all together.
Enjoy the journey.
Cindy aka EarthMotherMosaics


No comments:
Post a Comment