Showing posts with label #mirror. Show all posts

Tuesday, June 23, 2020

Tesserae Tuesday

There's a good chance that once the larkspur flower is finished and resting (waiting for glue to dry so it can be grouted), I'll be working on this ginormous crescent moon. Below is an example of how I work. The process is simple and not all that exciting but it is a process just the same.

I'm really not sure I'll have enough glass with these choice colors I've picked. At first, I had these:

Two different kinds of mirror and assorted blues (the lightest is iridescent). It is okay enough as it is, but I felt the amount I had of the blues might not be enough. That's when I started looking at my stash and deciding what else I could add. I found a tan or beige glass, also iridescent.

I don't think that's quite as "me" as I need it to be. I have some yellow and orange glass. That would look kind of cool. Both would work, actually, together with the glass I've already chosen.

I like this combination and will use them all. With the addition of the lighter colors that I like to use, the dark grout will make it pop!


Support Independent Artisans, Designers and Crafters for your gift-giving needs all throughout the year. Thank you!~Cindy, EarthMotherMosaics

Tuesday, January 28, 2020

Tesserae Tuesday

Last week I mentioned I'd be sharing Christmas gifts I've made for the next few weeks. The last 2 are on their way to their destination now. That means I can share them here when the time comes. I'm sharing them in the order I made them in.

The next one I made was this mandala.


Taking 3 different patterns (one of my own) and combining them, I created a really cool mandala. I wasn't sure how I'd get all the glass and circles on them. I knew this was a good start.


Adding ball chain and broken necklace pieces, stained glass, mirror, ceramic nano tiles and glass rod pieces, I started on the journey that was one of the most intense I've taken in quite some time.


Small pieces of glass and mirror required tweezers and a steady hand. This wasn't something I could zip through quickly.


I'll let the rest of this post speak for itself through photographs. What a wonderful journey this was.


The friends I gifted it with really love it. I am looking forward to making something like this again soon. Maybe on a glass plate, maybe like this one, on a board and framed. I have to say I loved the experience and felt I learned that although the original design was kind of lost, it didn't take away from the final results at all.


Support Independent Artisans, Designers and Crafters for your gift-giving needs all throughout the year. Thank you!~Cindy, EarthMotherMosaics


Wednesday, July 26, 2017

In The Studio - Wednesday

What a glorious week! I've completed my recycled mosaic as far as getting all the dish tiles and other goodies on it. It's waiting for grout. I have a large grout pile forming. It's safe to say I'll be grouting within a week or so.


Originally I had thought about putting tess on the bottom as well but it needs to be sturdy to hold a lit candle. I will share the grouting experience as I suspect it will take days.

Friday I'll be sharing the next project plus the one after that! I love being busy!!

Support Independent Artisans, Designers and Crafters for your gift-giving needs all throughout the year. Thank you!


Stay Peaceful and Enjoy the Moments.
Cindy, Earth Mother Mosaics

Monday, September 26, 2016

Promo Blast!

It's a Promo Blast! kinda day and it's coming from my newly re-opened shop on Etsy.

I'm thinking you'll be seeing some of my favorite shops not just on Etsy now that I'm back but also from the other shops I share my items online with. I like sharing! I'm looking forward to finding some new things to share, but you can be sure I'll also be sharing some old favs!

I learned that the Etsy Treasury is going to retire in October. While I'm very sad about that, I understand their thinking and am fine with making up my own, perhaps smaller versions, for this post. Meanwhile, I made a treasury when I opened my shop on my birthday last week and want to share it here.

Birthday Wishes

Today I picked one of my mosaics that is fairly new. It has a lot of mirror and stained glass, in fall inspired colors.

Flower Trivet Stained Glass Mosaic

$85.00 plus shipping

What a beautiful mosaic this is. Stained glass in hues of red, orange, light brown and yellow were hand cut into a flower. A small pewter cabochon flower in the center and silver mirror are placed in this too.


Bright and beautiful. Cadmium orange acrylic was painted on the bottom and sides.


Round feet on the bottom.


Measures 12.5 inches

This would make a great gift for anyone in your tribe. Treat yourself and give the gift of handmade mosaic art!

Support Independent Artisans, Designers and Crafters for your gift-giving needs all throughout the year. Thank you!~Cindy, EarthMotherMosaics

Tuesday, June 21, 2016

How To Make 4 Inch Mosaic Coasters Using Various Tesserae - Part Three

The last in the series of mosaic coaster making. Today, I'm sharing the fun you can have using stained glass and mirror.

In this post I've shown one way to make two 4 inch coasters from start to finish using stained glass and mirror. These coasters take 2 days to complete. They can be done in a weekend! Please refer to the previous post to see how to grout: mosaic-coasters-part-one.

For this project you will need:

1st part:

  • Stained glass and mirror
  • PVA glue
  • glass nippers
  • 2 MDF or wooden coasters (prime with a glue/water mixture as shown in mosaic-coasters-part-one)
2nd part:
  • Sanded grout
  • Gloves
  • Dust mask
  • Wooden craft stick
  • Newspaper or plastic
  • Clean, dry rags
  • Acrylic paint
  • Painters tape (optional)
  • Felt pads (optional)
  • String or ribbon (optional) 
This project is recommended for children 6 years of age and up due to the tools to cut glass. It must be handled with care at all times and adult supervision is imperative.

Art Level: Beginner/Intermediate
Difficulty: Medium

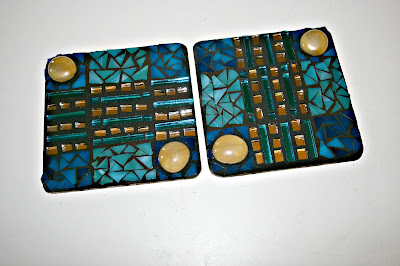
For these coasters, I drew a simple design to follow. You can have a lot of fun designing your coasters and considering what colors you'll use. I decided to go with 2 colors of blue, ice blue and blue & navy streaky stained glass, silver and turquoise mirror and glass 1/2 circles in cafe latte.

The first step is to draw the design and pick out the glass and mirror you want to use.
Some of the glass shown above was not used for this project. After studying the design for a bit, I decided to just go with basic blue and silver.

To make the design interesting, I used the mirror glass in the center.

Filling in the outer sections with stained glass, cutting the small square pieces into triangles.

Easy designs are best to use when learning how to mosaic.
All pieces are in place and the glue needs to dry for 24 hours before grouting.

The glass gems at the corners are to help keep a glass or mug in place when sitting on the coaster.
I decided to use black grout to give these coasters some added drama. I could have used many different colors. The final choice is yours!


Aren't they awesome?!


Wrap some ribbon around your coasters once the grout is dried and sealed. Gift them, keep them handy for those times when you aren't sure what to give someone or use them whenever you want to feel fancy.

Any questions? Please leave comments or send me a private message if you have anything you'd like to discuss.

Next week, I'll share a list of suppliers and a few people I admire who make mosaics for you. The fun of creating mosaics is to find inspiration to try new things!

Support Independent Artisans, Designers and Crafters for your gift-giving needs all throughout the year. Thank you!~Cindy, EarthMotherMosaics


Friday - My Health and My Future With Art

 My grandson's 18th birthday party was at a skating rink. He and his friends had so much fun! On Wednesday, I had an eye exam to check f...